Angle Tools and cut cards
A hip roof gives you angles a speed square does not have a mark for. Angle Tools puts each one on the phone's screen at its true angle, so you can set a T-bevel straight off the glass. It prints the same angle as a paper template that wraps the stock, and it measures an existing slope when you stand the phone on it. Cut cards give every piece its own card with the marks in the order you make them.
Both open from Hip & Valley, and use the numbers that calculator has worked out.
Step by step: set a T-bevel from the screen
 2
3
4
5
2
3
4
5
- In Hip & Valley, tap CUT DETAIL + JACK LIST in the results. On the Cut Detail page, tap ANGLE TOOLS — BEVEL SCREEN · 1:1 TEMPLATE · MEASURE.
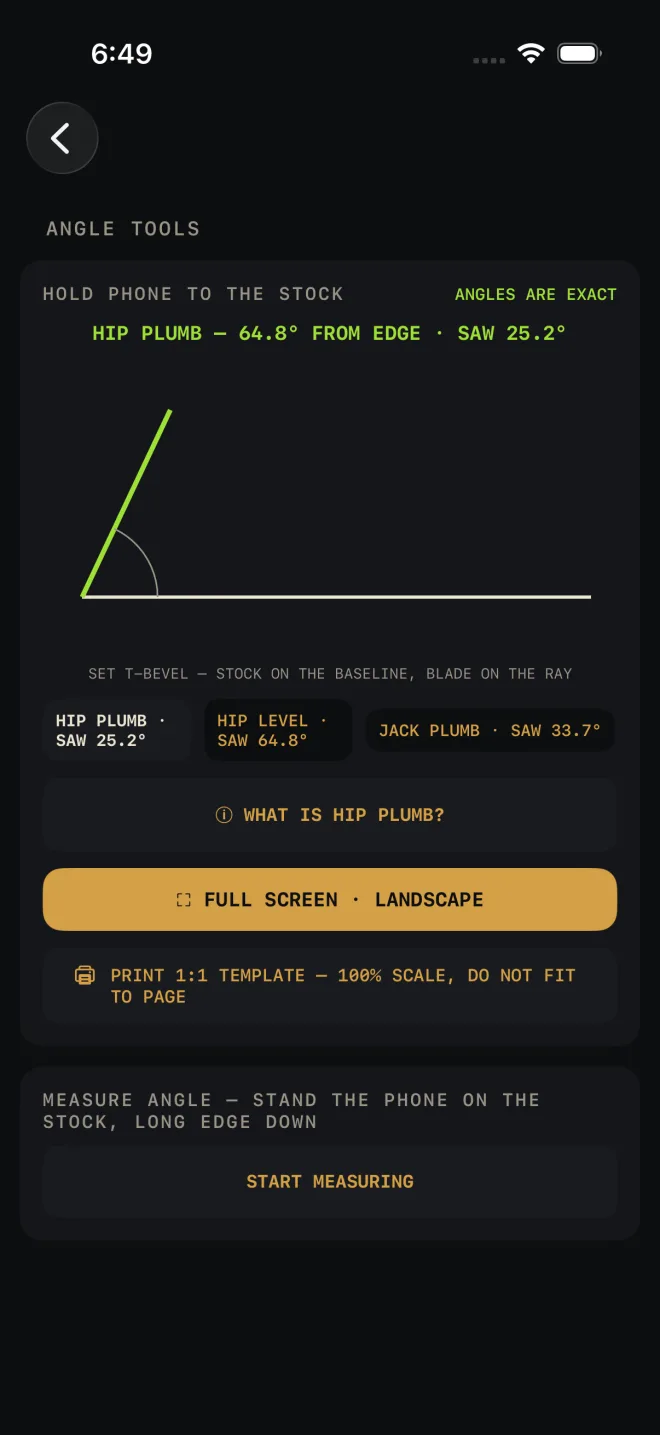
- Tap the chip for the cut you are making. For a hip they are HIP PLUMB, HIP LEVEL and JACK PLUMB. In valley mode the first two read VALLEY. Each chip carries its saw setting after the word SAW: in the shot, 25.2°, 64.8° and 33.7°. That word is there because the trade also quotes the from-edge figure under the same name.
- Read the line above the diagram. It gives the same cut two ways. SAW is the angle from square, which is what you dial on a miter saw. FROM EDGE is the angle the line makes with the edge of the board, which is what a bevel held against the edge reads. In the shot the hip plumb cut is 25.2° on the saw and 64.8° from the edge. The two always add up to 90°.
- Under HOLD PHONE TO THE STOCK, do what the caption says: SET T-BEVEL — STOCK ON THE BASELINE, BLADE ON THE RAY. Lay the bevel's stock along the pale baseline, swing the blade onto the green ray and lock it. An angle is the same at any size, so it needs no calibration. That is what ANGLES ARE EXACT means. Not sure what the cut is? Tap WHAT IS HIP PLUMB? (it is re-titled for the chip you are on). A sheet headed WHAT THE CUTS ARE opens with a drawing of the roof and a paragraph on where that cut lives on the rafter.
- For a longer line to set against, tap FULL SCREEN · LANDSCAPE. Turn the phone on its side. The phone's own long edge is now the baseline, so seat the bevel's stock against the edge of the phone and swing the blade to the ray, as the caption at the bottom says. The large figure is the angle from the edge; the line under it names the cut and gives the saw figure. The chips are still there to change cuts, and the screen stays awake while this is open. Tap EXIT when you are done.
Print a 1:1 template
- Pick the chip for the cut, then tap PRINT 1:1 TEMPLATE — 100% SCALE, DO NOT FIT TO PAGE. The share sheet opens. Tap Print.
- Print at 100%. Turn off any "fit to page" setting. Measure the 1" square on the sheet with your tape before you trust it. The sheet says so itself: PRINT AT 100% — DO NOT 'FIT TO PAGE'. VERIFY WITH THE 1" SQUARE.
- The sheet is a fold-over template drawn for the depth of that member: hip stock for the hip cuts, common stock for the jack. Its header gives the angle from the edge, the saw angle and the depth. Fold it on the line marked TOP EDGE — FOLD HERE, wrap it over the board so the fold sits on the top edge, and mark the cut line, which is labelled with its angle from the edge and its setback along the edge. Then square the line down the far face.
- Opened from the Cut Detail page, the HIP PLUMB (or VALLEY PLUMB) sheet carries one extra line in bold: HIP: ADD THE SECOND LINE + BLADE 45° BOTH SIDES — SEE THE CUT CARD. The JACK PLUMB sheet carries JACK: BLADE 45° FOR THE CHEEK — SEE THE CUT CARD. The HIP LEVEL sheet has no extra line, and neither do the sheets printed after opening Angle Tools from the inputs. The cut card has the full sequence.
If the cut will not fit a Letter page at true size, the sheet says TEMPLATE TOO LARGE FOR A LETTER PAGE AT 1:1 and gives the mark-out instead: use the bevel screen, or square a line at the long point, measure the printed setback back along the edge, and connect the points. The app never prints a shrunken template.
Measure an existing slope
Use this to match a roof that is already built.
- In Hip & Valley's inputs, tap the MEASURE button beside MEASURED ANGLE, or the line under it, MEASURE WITH THE PHONE — stand it on the stock, send the pitch. Opened this way, the chips are COMMON PLUMB and HIP PLUMB (or VALLEY PLUMB).
- Under MEASURE ANGLE — STAND THE PHONE ON THE STOCK, LONG EDGE DOWN, tap START MEASURING.
- Stand the phone on its long edge on the slope: on a rafter, or on the sheathing. It reads which of its two long edges is down, and it tells you if you are holding it wrong: LYING FLAT — stand it on the stock, long edge down or HELD ON THE SLANT — stand it on the stock, long edge down. When the pose is right, the big figure is the slope in degrees and the figure beside it is the same slope as a pitch in 12.
- Under the figures the screen draws a pitch gauge: a plumb bob. The stock line is level across the drawing and the needle hangs toward the downhill side by the slope, over a graduated arc, with a rise-over-12 step triangle beside it. The whole gauge is turned so it reads upright to you while the phone stands on the stock. If the needle does not hang plumb to your eye, the phone is not seated. The caption under it reads the angle and the pitch again.
- Tap → SEND TO PITCH. The reading goes into PITCH and you are taken back to the calculator. Tap STOP to end without sending.
Hip & Valley takes pitches from 1 to 24 in 12. A reading outside that is pulled back to the nearest limit, and a note under the inputs says what the reading was. Steeper than 24 in 12, the readout shows → OVER 24/12, the gauge leaves the step triangle out and says OVER 24/12 — RISE NOT SHOWN. A reading that is nearly vertical is not sent at all; the note says so. If you read the angle with another tool, type it into MEASURED ANGLE on the Hip & Valley screen and tap → PITCH.
Measuring also works when you open Angle Tools from the Cut Detail page, but → SEND TO PITCH is only offered when you come in from the inputs.
Cut cards
 1
2
3
4
5
1
2
3
4
5
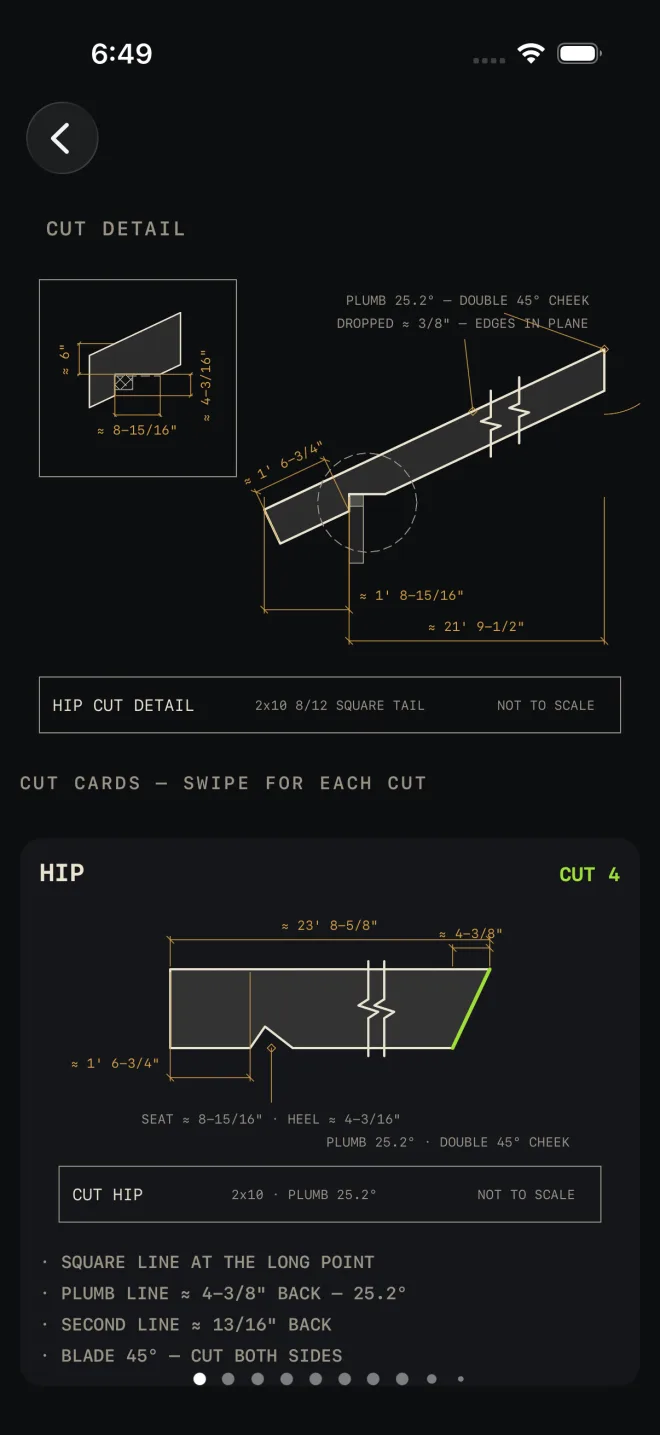
- Tap CUT DETAIL + JACK LIST in the Hip & Valley results. The top of the page is the member in elevation, with the birdsmouth enlarged in the corner box and the head cut labelled PLUMB 25.2° — DOUBLE 45° CHEEK. It pinches and pans like any other drawing.
- Under CUT CARDS — SWIPE FOR EACH CUT, the card's heading names the piece and the badge on the right says how many. The shot shows HIP and CUT 4: one hip per corner, four corners. The common rafter's card is marked REFERENCE CUT because it is there for the angles, not for a count. A jack card reads CUT … TOTAL · 2 PER CORNER: the whole job first, then the pair at each corner, so the big number is never mistaken for one corner's count.
- The board on the card carries the length to the long point, the setback of the plumb cut and the birdsmouth station. The cut at the ridge end is picked out in green and labelled with its angle: PLUMB 25.2° · DOUBLE 45° CHEEK here. A jack's reads SIDE CUT 45.0° instead, and the common's has no cheek. The title strip repeats the stock and the plumb angle.
- The lines under the board are the marks in the order you make them. For the hip in the shot: SQUARE LINE AT THE LONG POINT, PLUMB LINE ≈ 4-3/8" BACK — 25.2°, SECOND LINE ≈ 13/16" BACK, BLADE 45° — CUT BOTH SIDES. The common's end with CUT THE LINE — NO CHEEK. A jack's start at the cheek's long side, and end with the blade at 45° for a single cheek, plus a green line saying one right-hand and one left-hand per corner, and that the offcut is the opposite hand.
- Swipe sideways for the next card. The order is the hip or valley, the common, then each jack. The dots show where you are.
Below the cards, the list headed JACKS — ONE CORNER · CUT IN PAIRS gives every jack with its pair count, its length and its two saw angles. If a cut list from this calculator is running, the page opens on the card for the piece you are up to, and that jack is highlighted in the list with a scissors mark.
If it doesn't work
- The bevel does not match the saw. Check which number you used. A bevel held against the edge of the board reads FROM EDGE. The miter scale on a saw reads SAW. They are different numbers for the same cut, and the chips only ever show SAW.
- The full-screen view is sideways. It is drawn for a phone held on its side. Turn the phone. It does not rotate by itself because the app stays in portrait. An iPad rotates on its own.
- The measuring card says NO MOTION SENSOR ON THIS DEVICE. The device has no motion hardware available to the app. Type the angle into MEASURED ANGLE on the Hip & Valley screen instead.
- The reading does not look right. Read the red line under the figures. The phone is lying flat or held on the slant. Stand it on a long edge and the line goes away.
- There is no → SEND TO PITCH button. You opened Angle Tools from the Cut Detail page. Go back to the Hip & Valley inputs and open it from MEASURE there.
- The template printed the wrong size. The printer scaled it. Set the scale to 100% and check the 1" square.