Crown Molding
What it's for
Setting a miter saw for crown, laying the crown out on the wall, and counting the sticks to buy. You enter the spring angle, the corner you measured, the size of the crown and the footage, and walk away with the saw settings for cutting the crown flat and for cutting it nested, the projection and height it takes up in the corner, a stick count, and a section drawing with the corner in plan. It says whether a stock saw can make the cut. It is not a code check.
Step by step
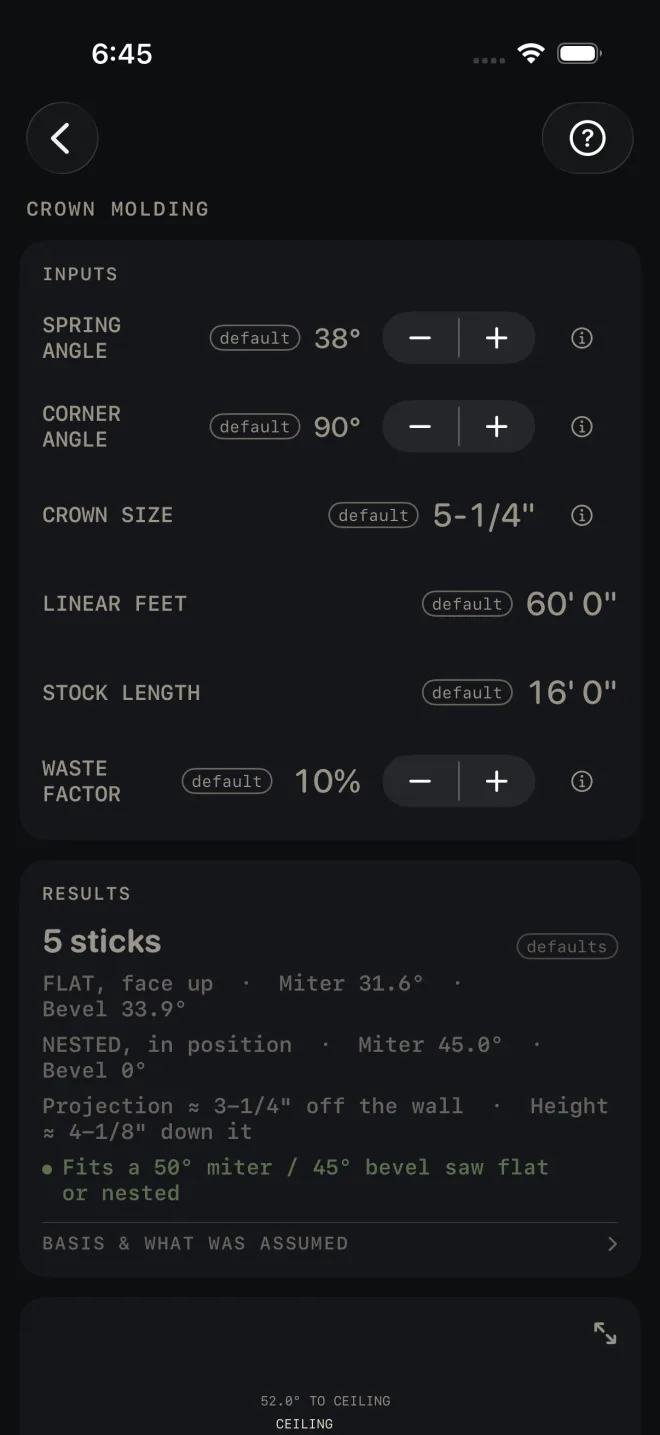
The example is the screen as it opens: 38° crown, 5-1/4" across the back, in a square 90° corner, 60' of it, bought in 16' sticks.
 1
2
3
4
5
1
2
3
4
5
- SPRING ANGLE — the angle the back of the crown leans off the wall once it is up. Tap the number to type it, or use − and + to move it a degree at a time. The screen takes 1° to 89°. The example is 38°.
- CORNER ANGLE — the angle the two walls make where they meet, measured inside the room. Enter the corner you measured. An outside corner is entered as its inside equivalent: the saw settings are the same, the cut runs the other way. The screen takes 10° to 170°. The example is a square corner, 90°.
- CROWN SIZE — the width straight across the back, from the edge that lands on the wall to the edge that lands on the ceiling. That is the size crown is sold as. Do not measure around the face: the same stick reads noticeably wider that way. This one number sets the projection and the height in the results. The example is 5-1/4".
- LINEAR FEET — the total run of crown. Measure each wall along the ceiling line and add them up. 60' 0" here. STOCK LENGTH — the length of the sticks you will buy. 16' 0" here.
- WASTE FACTOR — the extra for miters and bad ends, in steps of 5% up to 50%. It opens at 10%.
- Read RESULTS: 5 sticks, then the two ways to cut it — FLAT, face up · Miter 31.6° · Bevel 33.9° and NESTED, in position · Miter 45.0° · Bevel 0° — then Projection ≈ 3-1/4" off the wall · Height ≈ 4-1/8" down it, and the green line Fits a 50° miter / 45° bevel saw flat or nested.
- Tap BASIS & WHAT WAS ASSUMED before you set the saw. It says which pair is for which way of cutting, and which half of the cut you keep.
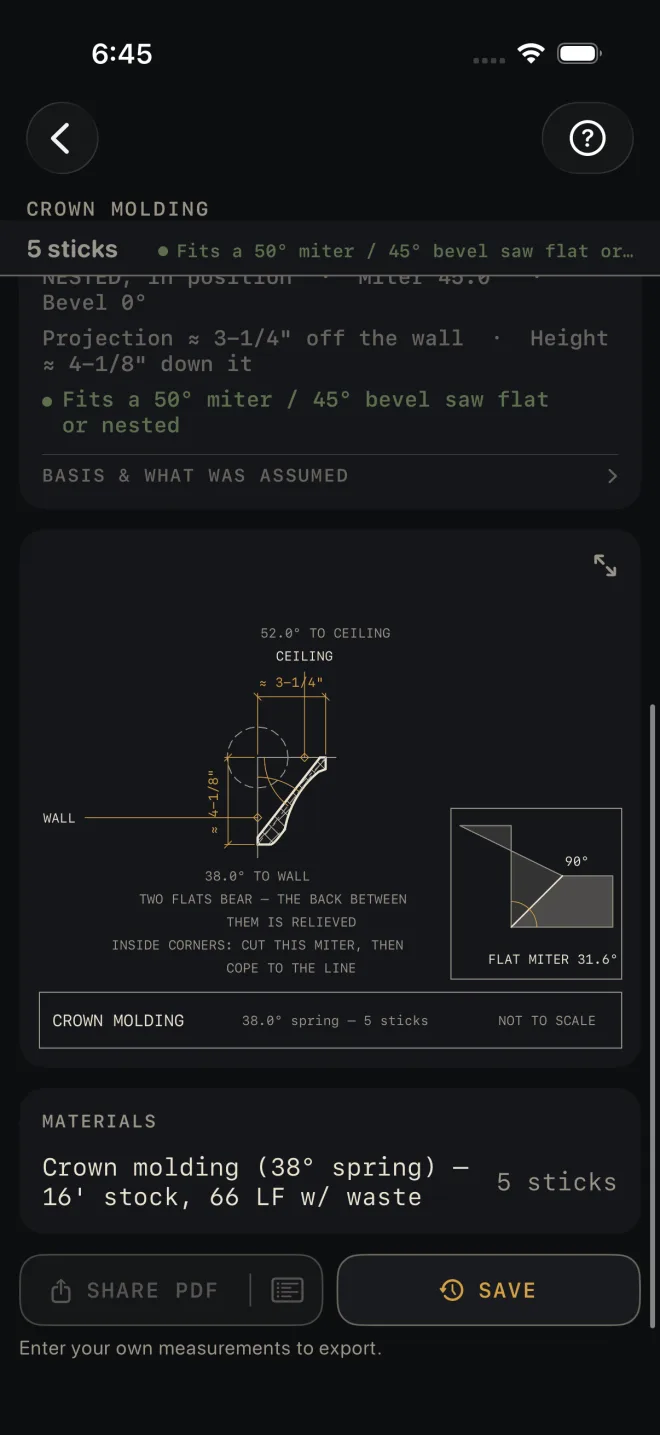
- Check the drawing: the crown in section sitting in the corner, with the spring angle to the wall, the projection and the height on it, and the corner in plan in the inset.
- Read MATERIALS — Crown molding (38° spring) — 16' stock, 66 LF w/ waste, 5 sticks — then share or save the job.
 6
7
8
9
6
7
8
9
Reading the results
The headline is sticks to buy: your footage plus waste, divided into the stock length and rounded up. The defaults tag means you have not entered anything of your own yet. The headline and the saw line also show in a strip under the title whenever the results card is scrolled off screen.
FLAT, face up is the compound setting: a miter and a bevel, both to a tenth of a degree, for the crown lying flat on the saw table with its face up. NESTED, in position is the other way: the bevel stays at 0 and only the miter scale moves. The nested miter is 90° less half the corner, so at a square corner it is 45.0°. The spring angle does not enter the nested figure at all. Both pairs are always on screen, because which one you can use is decided by your saw, not by preference.
Projection is how far the crown stands out from the wall along the ceiling. Height is how far it drops down the wall. Both come from the crown size and the spring angle. Height is where the chalk line goes, and the least fence a nested cut can be made against. Projection is the clearance you need over a cabinet or a light cove. If you do not know the spring angle as a number, set CROWN SIZE from the stock and nudge SPRING ANGLE until these two match what you tape on a scrap held in the corner.
The saw line checks each method against a stock saw that miters to 50° and bevels to 45°, each method by its own pair. It reads one of four ways:
- Fits a 50° miter / 45° bevel saw flat or nested — either way works. The example.
- Fits a 50° miter / 45° bevel saw flat only — nested would need …° — cut it flat.
- Fits a 50° miter / 45° bevel saw nested only — flat would need …° / …° — cut it nested.
- PAST A 50° MITER / 45° BEVEL SAW FLAT AND NESTED — COPE THE INSIDE CORNERS OR CUT A JIG — neither setting is on the saw. The drawing carries the same flag. The fix is not an input; it is the joint.
BASIS & WHAT WAS ASSUMED opens three lines. Read them before you cut.
- Miter + bevel above are for cutting the crown FLAT on the table, face up.
- NESTED (in position) instead: bevel 0, and the saw's MITER scale reads 45.0° — the spring angle does not enter it. Nested means upside down and backwards: the ceiling flat lies on the table, the wall flat rides the fence. The figure in the line is the nested miter for the corner you entered.
- Keep-side: INSIDE corners keep the piece with the SHORT point at the ceiling edge; OUTSIDE corners the LONG point — dry-fit the first pair. The half of the cut you keep flips between inside and outside corners. Cut a pair of short offcuts and try them in the corner first.
The drawing is the crown in section, sitting in the corner between WALL and CEILING, cut end-grain. It shows the two short flats the crown bears on and the relieved back between them. Both angle arcs are struck from the corner where the wall meets the ceiling and measured to the line of the crown's back: 38.0° TO WALL is the spring angle you entered, and 52.0° TO CEILING is the rest of the 90°. The two dimension rows are the projection along the ceiling and the height down the wall. The notes under the section read TWO FLATS BEAR — THE BACK BETWEEN THEM IS RELIEVED and INSIDE CORNERS: CUT THIS MITER, THEN COPE TO THE LINE. The inset at the bottom right is the corner looking down: the two walls, an arc across them reading the corner you entered — 90° here — the two pieces of crown, and the joint line from the corner to the short point, with FLAT MITER 31.6° captioned under the plan. A very tight or very open corner is DRAWN at a readable opening so the plan does not collapse to a sliver; when that happens the caption says so, as in DRAWN 40° N.T.S., and the figure by the arc is still the corner you entered. The title strip repeats the spring angle and the stick count. Pinch to zoom, drag to pan, double-tap to reset. The expand button at the top right opens it full screen. See Reading the drawing.
SHARE PDF sends a sheet with the drawing, the flat miter and bevel, the nested miter, the projection, the height, your inputs, the keep-side rule and the material list. The list icon at its right end sends the material list alone. SAVE puts the job in History. SHARE PDF and the list icon in it stay dim until you change at least one input. SAVE stays lit, but while every input is still a default a tap only answers Enter your job's numbers first and saves nothing.
Common mistakes
- Entering the spring angle off the ceiling. The screen measures it from the wall. The drawing prints both, and the one marked TO WALL is the one you entered.
- Measuring the crown around its face. CROWN SIZE is straight across the back. Around the face reads wider, and the projection and height come out long.
- Mixing the two pairs. The flat miter and bevel go together, on the table face up. The nested miter goes with a bevel of 0 and the crown upside down against the fence. A flat miter dialled on a nested crown is wrong on every corner.
- Assuming the corner is square. Measure it and enter the corner you measured.
- Cutting the finished length first. Dry-fit a pair of offcuts, as the basis row says, then cut the real pieces.
Related
- Trim — counts crown room by room, with corners
- Angle Tools
- Cut List Optimizer — fitting wall lengths into sticks
- Cut sheets and 1:1 templates
- Saving and History
- Reading the drawing